Pages

Wednesday, February 27, 2013

70's Lace Gown Gets a New Look

Several years ago I was given a 70's tiered lace gown and had the idea to remake it. I apologize that the pictures are such a poor quality they were taken for personal  reference and I no longer have the gown to take new pictures.

I'm posting it now because it was a relatively simple remake and shows how much can be accomplished with just a little effort.


Original Dress


The first step was to remove the sleeves and add a waist to the gown. 


Next I split the top down the middle and pulled it to the sides to create a lapel look. 


Tips for Thrift Store Creations.

The ability to transform an everyday item into something greater has always been a hobby of mine. But over the last 2 years it has become more of a passion. I love to explore my local thrift shops for those everyday items that can become an amazing costume. People have often asked me how I do it, and while the instructions may be project specific the mind set and creativity are not. Anyone can create, it is just a matter of knowing how. Below are a few tips to keep in mind for any project.

1. You Are Not A Machine

To do this you must first realize that you are not a machine, and things are not going to be perfect. In fact they are probably going to be mistakes. In the age of machines this can be a difficult but important thing to accept. You are human, and you are making a handmade item.

2. Have a Plan

Don't start cutting until you have a plan for what you want to make and an idea of how you will make it. Remember once something is cut it is hard to put back together.

3. Try Again

The old saying "If at first you don't succeed try again," certainly applies to remaking clothes. There are many times I will be certain how a project is going to go only to have it change mid stream. You need to be flexible  and change with the obstacles that you need to overcome.

4. Think Outside the Box

When approaching a project don't restrict yourself to just the usual fabric and thread, think outside of that. Concentrate on the shape, feel, or overall aesthetic you are looking for instead where it will come from. Don't restrict yourself to fabric stores either, hardware stores, and your local Walmart have great finds as well.

5. Don't Go Overboard

Make sure that you have the skills, or can obtain the skills to make the item you want. Don't dream bigger than your hands can complete unless you are willing to learn the new skills. Working on a project you can't finish will only frustrate you and make a terrible experience.

6. Be Yourself

Don't let others sway you from your vision. If you want a feathered skirt then make a feathered skirt. You are wearing it not your friends accept their advise but make the things you want to make.

7. Be happy

The most important part of remaking anything is to be happy with the result. Accept the things you can not change and make it yours. In the end you will be the one wearing it and only you have to love it.


Remember there is no right or wrong. This is your creation and only you know how it was supposed to look.


Sonic the Hedgehog Quilt


Last summer I made quilts for both of my nieces that reflected their personalities and individual interest. The eldest Madison is a video gaming, rock climbing, fearless young woman who loves bright colors, and Sonic the Hedgehog. She and her friends have even created their own Sonic characters, and I wanted to incorporate it into the quilt.

To start I ordered 3 iron on Sonic images off of Ebay and sketched out the design. I then went to the quilt shop once again and with the help of a friend picked out 4 amazing fabrics in bright colors, 3 yards of Moda white, and 3 yards of basic black fabric. All in 100% cotton.

Returning home I used my trusty printer to print out large letters spelling her characters name and traced them onto freezer paper and ironed it onto the bright colored fabric. Using a basic needle turn applique stitch I placed one letter on each white fabric block.

With the remaining fabric I created 2 fabric braids and framed everything with black sashing. To finish it off I tie dyed white cotton fabric in a vibrant blue dye for the backing.

The quilt was then machine quilted with a variegated thread that looked amazing! Having completed it I have to admit that the fabric braid is not my favorite pattern. It was time consuming and I prefer applique to piece quilting.

Tuesday, February 26, 2013

Lego Star Wars Quilt


Like many boys his age my son LOVES Star Wars Legos. Especially the minifigs. So when I decided to make him a new quilt for his bed I knew it had to have the Lego Star Wars guys on it.

To make this I printed out a drawing of a lego minifig on the printer. A link to this picture is here: http://www.starwars.com/kids/activity/draw/f20060830/img/3.jpg

After printing the pictures in the size needed I sketched thier basic clothing and hair on the print outs and labeled each area with the corresponding color.

Now that I had a pattern all I needed was fabric. Of course that was the fun part! In the end I purchased over 20 fat quarters in varying colors. As well as the red border fabric, and the lego looking block fabric.

With the patterns and fabrics ready I used a basic hand applique technique to create the individual character block. Since I had only taken one applique class and completed one project prior to this my technique wasn't perfect. But I doubt my kid even notices.

Once the quilt top was completed my great friend Pam helped me use her long arm quilting machine to complete the star patterned quilting.


Creating Mr. Underhill- A Child Hobbit


The Making of a Hobbit
Recently I decided to move some of my old projects to this blog from my previous sewing blog. Here is one from last year. 

This is a rather simple hobbit costume with little sewing required that I made for my son for last years halloween and necrocomicon. 


The basics of the costume are:

  White Button up Shirt
  Vest or Jacket
  Mid Calf Length Pants
 Cape

The Shirt: The button up shirt was easily obtained at the department store while the rest of the costume took some work.

The Vest: This vest was made using a fake crushed velvet material in a bright color using McCall’s pattern 4290 view C. For the buttons I used one of my tried and true budget friendly ideas and purchased a used men’s jacket at the thrift shop for $3. I then removed 6 identical buttons; these gold buttons would have cost three times what I paid for the jacket.

The Pants: For the mid-calf pants I purchased regular length pants at the thrift store. I then cut the pant legs to the length needed and hemmed them.

The Cloak: The cloak was created using a brown cotton fabric and Simplicity Pattern 0862. The clasp on the cloak is a brooch I found, once again, at the thrift store.

Bringing all of these pieces together created a picture perfect little Hobbit and my little guy had a great time playing Mr. Underhill. He plans to wear this again at our local Ren Faire and I might just need one to go with it.


Monday, February 25, 2013

Spats- Steampunk Style

I've been working on a new outfit and want to include spats. Here is my inspiration for the project. I hope it inspires you.


Sunday, February 24, 2013

Steampunk on the Red Carpet

In honor of the 2013 Oscars I present a compilation of what should have been seen on the red carpet.


Steampunk Treehouse

I'm not sure who made this but it is one of the most amazing things!

Saturday, February 23, 2013

Steampunk Military Style

Lately I have noticed an increase in the number of ladies sporting military inspired fashions. Even the popular Felicia Day was photographed in military steampunk. But she wasn't the first or the last lady to sport the look. Below are some of the greatest military looks I have found.


Felicia Day 


Created By:  Amanda Scrivener


Creator Unknown


Creator Unknown

It's a doll but the outfit is still nice. 
Create by Couture Dolls


Creator Unknown


Bag for a Steampunk Ball

Last year I attended the Masquerade Ball at the Florida Steampunk Exhibition East in Daytona and wanted a small bag to carry for the evening. But just any bag wouldn't do so I made a special one for the occasion.

This purse was created using a small unfinished box, with a wheel shape cut out, that I picked up from Michael's for $2.50.

I sanded the box to make sure it was smooth then painted it with metallic acryllic silver paint. The leather straps were added by using a small drill to place holes and in the box and then inserting the grommets through the leather and wood.

I then added small buckles to each leather strap at the top to hold the box closed and drilled two holes in the top to screw in the handle which I find in the kitchen section of the hardware store.

For the wheel area I used hot glue to place a decorative button in the center and small fuses on the spokes.

It worked wonderfully for the occasion as it was just big enough to hold a cell phone, my ID and some cash for the evening.

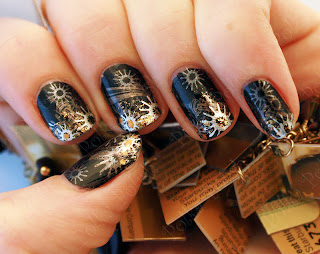
Steamy Nail Designs

Manicures and pedicures are a great way to add some flare to your steampunk look. Below are some great ideas for Steampunk nail designs:


These aren't really steampunk but with the popularity of the octopus growing in the community I added them anyway. 

Friday, February 22, 2013

How To Create Steampunk Wings #1


This is the first of a series of articles regarding the creation of my wings. It is an ongoing project that will be updated as it progresses. 

Several months ago I had the idea of making wings to go with my Pixie persona. I knew I wanted them to be metal and steampunk, but wasn't sure of their exact design. Since I do not have any metal working skills I enlisted the help of my step father Bob and my little brother Joe.

We started by sketching ideas of what the wings might look like and what materials we could use. I knew that I wanted it to have large gears and after giving it some thought decided to use bicycle gears. Normally I am junk yard shopper for these kinds of parts but I needed 2 of each gear to make the wings identical so I purchased them at a local bike shop for a total of $50 for 6 gears. In addition to the gears we purchased 2 pieces of rebar, 2 metal rods, and several smaller metal rods at the local hardware store. Total cost was approximately $18.

To begin Joe used his anvil to shape the rebar to match the upper curve of the wing following a full sized sketch we had created for reference.


One of the hardest parts was getting two identical pieces so that the wings would be symmetrical.


Once he was satisfied with the top he used the anvil again to shape three smaller curved pieces to fit around the bottom of the gears forming the base of the wings.


After the shaping of the wings they had to prep the gears for welding by removing the paint near the welding area. They then began to spot weld the rebar to the gears working from the largest gear to the smallest. Next they spot welded the lower metal rods to the bottom of the gears and connected the two top and bottom rods to create the tip of the wing and cutting off any excess. To clean up the look they also smoothed the welded areas so they were less prominent.

Here is the final product after the metal work was completed.


Though it may sound simple on paper a lot of time, effort and skill were needed to complete the project.

I huge thank you to Joe and Bob for making my dream a reality. Now I just need to paint them and make the pack they will fit in!

Total Cost for Phase 1 : $68.00


Wednesday, February 20, 2013

Steampunk Maternity

In a few weeks I plan to attend the local Ren Fest in with the members of the Airship Annabel Lee. A friend who is new to steampunk will be joining me and wants to go in steampunk garb as well. But she is pregnant and doesn't want to wear a corset, for obvious health reasons. So she asked "What kind of costume could she wear?". I've given it some thought and here are my suggestions for going steampunk during pregnancy. 

First Trimester
Since your tummy will be smaller you have more options during this time. But remember that you will be visiting the ladies room more frequently. 

Lolita Dresses (Still hate the name)
The high waist and flowing skirts are great during pregnancy and can still be worn after. 


Created By Long Live Lolita

News Boy
Short pants with a white button down a vest will give you room for comfort and layers if you get hot. 


Creator Unknown

Second Trimester
With your baby and tummy growing you will want to consider looks with room to grow. You don't want to start making an outfit and outgrow it before you get a chance to show it off. 

This look has a split front shirt and would work well during phase of your pregnancy.


Created By: Flitzichen


This Jacket with only one button would accomodate both the baby and a Victorian inspired look.


Created By talamhruel
Third Trimester
As the end of your pregnancy nears it may become harder to find costume pieces that both fit the aesthetic and are comfortable. But here are a few choices for you. 

Pregnant and Proud! Show off the baby!


Created By: Ariel Meadows

Gown with Jacket
This flowing  dress and short jacket are a great combination during any phase of pregnancy. 


Created By Marisa Taylor


These are just a few ideas to inspire you. Remember to be creative, and wear what makes you feel comfortable and beautiful!

Have ideas of your own? Please share in comments.